Thursday, December 31, 2020

All about Mi 5C China Rom Phone - How to Flash Rom ? & How to enable 4G LTE on Xiaomi Mi5c? & How to Install Android Apps?


Steps to Install MIUI V8.5.3.0.NCJCNED Global Stable ROM on Mi 5c.


Fastboot Mode

  1. Download MI Flash tool, Unzip and Install it on your PC.
  2. Download MIUI V8.5.3.0.NCJCNED Fastboot file for your device from above link.
  3. Reboot your device into Fastboot mode ( Press “Volume Down + Power” buttons to enter into Fastboot mode)
  4. Connect your device to PC
  5. Extract the downloaded fastboot zip file and copy the folder path.
  6. Open the MI Flash Tool and Paste the copied folder path in the MI Flash Tool.
  7. Click on the refresh button (It will recognise your device) and click on the flash button to start the installation.
  8. Wait until the installation process completes.
  9. Done!!!
Download:


How to enable 4G LTE on Xiaomi Mi5c?


if your mi5c is running china rom and you are getting 2G network only, then you need to do something to enable the 4G and 3G network. Don't worry it's not difficult to enable 4G network on mi5c, just follow my step by step tutorial below.

Step by step how to enable 4G network on xiaomi mi5c
  1. go to phone dialing menu
  2. dial this number
  3. *#*#1#*#*
  4. the 'Song Assistant' menu will appear, select 'TEL_Assistant'
  5. select 'Telephony' and then 'Radio Access Tec'
  6. choose the '5 MODE' and then 'Save'
  7. reboot/restart your device
  8. done! you should now have 4G network

How to install Google Play Store in any China MIUI 

 To install Google Play Store on your MIUI. Follow the steps below to install google play store on your MIUI.

1. Go to the Mi App Store and search for Google on the search bar. Now scroll down to bottom and click on the Baidu icon. You'll see an app about 168 KB size with Google Play Store logo, install it.


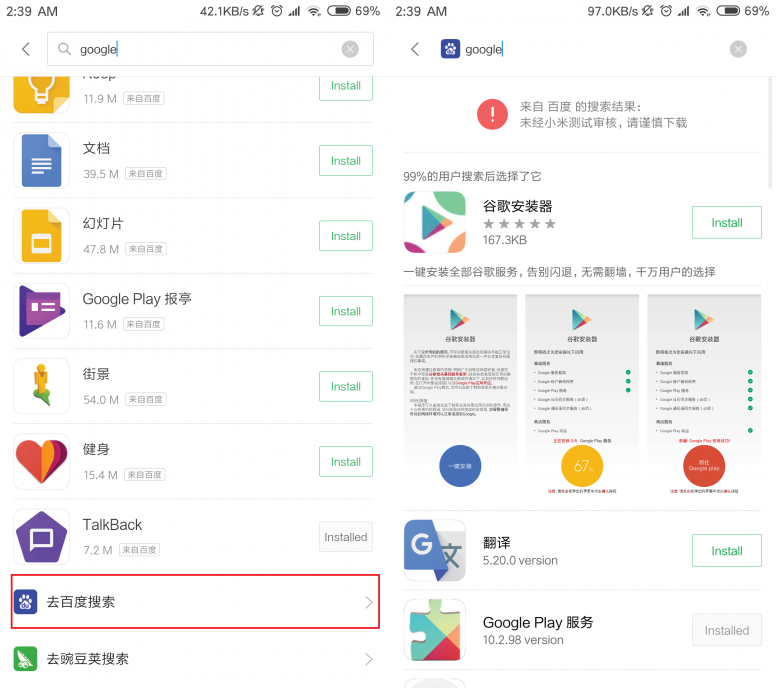
2. Open the app and click on the blue round icon below. It will start downloading the Google Service Framework. You'll need to install it manually just by clicking install.
Note: You'll need to enable Unknown sources from Privacy setting. If not enabled, it automatically promotes for enabling.

3. Now it will download Google Account Manager, Google Play Services, Google Calendar Sync, Google Contact Sync one by one and you'll just need to tap on install.

4. Finally, it will download Google Play Store! Just install!

5. After installing Google Play Store, log in to the Play Store using your Google Account and Enjoy Google Play Store.

That was it! Hope this will help you to install Google Play Store easily.

Source from Internet


Thursday, June 11, 2020

Infinitely Looping Startup Repair Loop without Reinstalling Windows 7


If you've ever experienced a Startup Repair that continously loops and fails to fix the problem of not being able to load windows, even in safe mode, then you'll know that usually the only way to recover from this when System Restore does not work is to do a clean install of Windows.

Until now.

This tutorial will show you how to use the System Recovery Options provided by Windows to recover your system to a working state so that you don't have to risk losing data by performing a clean install.

Recovering Your System
  1. Boot to the System Recovery Options screen.
    • If Windows automatically opens Startup Repair, and subsequently fails to fix a problem, you can skip ahead to step 4 below.
  2. In the System Recovery Options screen, click Startup Repair:

  1. Windows will search for an attempt to repair startup problems:

  1. If startup problems could not be repaired, you will receive the message Windows cannot repair this computer automatically. Click View advanced options for system recovery and support:

  1. Click View advanced options for system recovery and support, which which bring you back to the main System Recovery Options screen.
  2. Click Command Prompt:

  1. Command Prompt should open to X:, which is an internal ram disk use by System Repair:

  1. Now you need to find your system drive. Depending on how your system is setup, this could be either C: or D:.
    1. Type C: and press .
    2. Verify that this is your system drive by typing DIR and pressing . If you see the Program FilesUsers and Windows folders, then you have found your system drive, and can continue to step 9 below.
    3. If the drive is not your system drive, repeat steps I and II above, changing the drive letter to D, E or some other letter until the system drive is located.

  1. When you have located your Windows system drive, type CD \windows\system32\config and press :
  2. Type DIR and press , and verify that the following files and folders exist in the config folder:
    • RegBack (which is a folder)
    • DEFAULT
    • SAM
    • SECURITY
    • SOFTWARE
    • SYSTEM

  1. Type MD mybackup and press  to create a backup folder that you can use incase this procedure does not work as expected.
  2. Type copy *.* mybackup and press .
    • If Now you need to check if you can use the automatic Windows backups to restore your registry:
    1. Type CD RegBack and press  to go to the RegBack folder.
    2. Type DIR and press  to view the contents of the folder. All the following files must exist:
      • The DEFAULT, SAM and SECURITY files should each be about 262,000 bytes in size.
      • The SOFTWARE file should be about 26,000,000 bytes.
      • The SYSTEM file should be about 9,900,000 bytes.
      • The file sizes presented here are approximate estimations, and may vary depending on your system. If any one of them are 0 bytes, then you should stop what you're doing now and seek an alternative method of recovering your system, because Windows cannot function with a 0-byte size registry hive.
    3. If the hive files listed in RegBack are ok, then proceed to step 14 of the tutorial.

  1. Type copy *.* .. and press  to copy the backup hive files to \Windows\System32\config.
    • If you are prompted to overwrite existing files, press A to allow all file to be overwritten.

  1. Type exit and press  to close the command prompt.

  1. Click the Restart button to reboot your computer. If all goes well, your system will boot normally.


Use Windows 10 Boot Loop Automatic Repair
Windows 10 boot loop automatic repair can appear after several times boot failure. And from there you can do some rescue for Windows 10 reboot loop. Please try the followings:
Step 1. Power off the PC and then power it on. As soon as you see the rotating loading circle, press and hold the Power button to shut it off.
Step 2. Repeat this process a few times until you see the "Preparing Automatic Repair" screen.
Step 3. After "Diagnosing your PC" interface, you will see the "Automatic Repair" screen. Here you need to select "Advanced options".
Step 4. Select "Troubleshoot" -> "Advanced Options" where you get multiple choices.
Step 5. Select "Command Prompt" and continue running the following command lines:
  • c: (Note that you system drive may be different. You will have to figure it out by yourself by viewing the directory.)
  • dir
  • cd \windows\system32\config
  • MD backup
  • copy *.* backup
  • CD regback
  • dir
  • copy *.* ..
  • A
  • Exit
 When you get back to "Choose an option", click "Continue (exit and continue to Windows 10)" and see if Windows 10 continuous reboot ends.


 Source From Internet


Share a Printer from XP to Windows 7/8/10

  Setup Printer Sharing Step 1 : First make sure that the printer on the XP machine is shared. You can do this by right-clicking on the prin...