Wednesday, March 15, 2023

Share a Printer from XP to Windows 7/8/10


Setup Printer Sharing

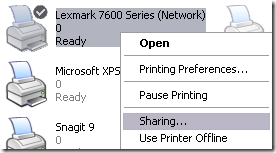
Step 1: First make sure that the printer on the XP machine is shared. You can do this by right-clicking on the printer and choosing Sharing.

share printer xp to 7

Click the Share this printer radio button and give your printer a share name. Make sure is less than 8 characters and does not contain any symbols.

share printer

Step 2: Make sure you can see the printer share from the network browsing area in Windows 7/8/10. You can do this by going to Control Panel and clicking on Network and Internet.

win 7 to xp printer sharing

Then click on View network computers and devices under Network and Sharing Center.

printer sharing win 7

At this point, you should see the name of your XP computer in the list of computers. My XP machine is called Aseem.


network printer sharing

Double-click on the computer name and you should see your shared printer in the list. Here you can try to add the printer by right-clicking on it and choosing Connect.

connect to printer

If everything goes perfectly, Windows 7/8/10 should automatically add the printer to your set of printers. However, if you get a message like “Cannot connect to printer”, follow the next steps.

Step 3: Click on Start and then click on Devices and Printers. At the top, click on the Add a printer link.

add printer win 7

Step 4: Next choose Add a local printer. Yes, that sounds counter-intuitive, but this is what you have to do!

local printer win 7

Step 5: Next, click Create a new port and choose Local port from the list of options.

create new local port

Step 6:  Click Next and in the Port name box, type in the path to the shared printer. It should be something like \\Aseem\HPXP, where Aseem is the name of your XP machine and HPXP is the shared name of the printer.

printer share name

Step 7: Now choose the printer driver from the list or download the latest driver for the printer and choose Have Disk. Note that if you printer is a little older, it’s a good idea to download the Windows 7/8/10 driver for the printer and before clicking Have Disk.

add prin to win 7

That’s it! Windows 7/8/10 will load the driver and you’ll be able to print to the XP machine from Windows 7/8/10! The main things to remember are sharing the XP printer and downloading the latest driver for the printer on the Windows 7/8/10 machine.


** SOURCE FROM INTERNET

FIX: Error 0x00000709 in Network Printing (Element not found)


The cumulative update KB5006670 for Windows 10 brought a number of enhancements and it resolved around 74 problems. However, many users report that the KB5006670 update causes problems with network printing (the printer is unresponsive) or problems setting up the default printer or failure to install a shared network printer with error 0x00000709.

Problem description:  After you install the KB5006670 update on Windows 10, users cannot print or connect to network printers or set a printer as the default printer with error(s):

Operation cannot be completed (error 0x00000709). Double check the printer name and make sure that the printer is connected to the network.

or

Element not found

or

Add Printer: Windows cannot connect to the printer – Operation failed with error 0x0000007c or 0x0000011b.

or

Network Printer Not Responding

* Important: Microsoft claims that printing errors 0x00000709, 0x0000007c & 0x000006e4 are resolved with KB5007253 update. So, before proceeding to the methods below, download and install manually the KB5007253 from Microsoft Update Catalog and see if the problem is fixed.


** SOURCE FROM INTERNET


Thursday, December 8, 2022

Reset Lost windows 10/7 logon password


There are various methods to reset your password. I have mentioned two of them here:

1. Using Hiren's Boot CD PE Windows 10

If you already have a bootable media of any os, skip to method 2.

  • Download Hiren's Boot CD PE ISO from here.

  • Download Hiren's Boot CD PE ISO Burner from here.

  • Burn the ISO into a flash drive/ DVD drive/ or whatever you want using the tool, instructions are here.

  • Now insert USB into PC, shutdown it.

  • Now boot your pc, press key F12/F11/DEL/INSERT/depending on your PC.

  • Select the media of Hiren's Boot CD PE.

  • Wait until it boots.

  • After it boot, Click on Start Menu

  • Click on All Programs

  • Click on Security Folder.

  • Click on Password/Password Recovery folder.

  • Click on Lazesoft Password Recovery

  • Click Next.

  • Now click on "Administrator" account.

  • Click Next.

  • Click Reset/Unlock.

  • Wait until it shows success then shutdown.

  • Remove the Media and turn it on again.

  • Log in to Administrator account, no password should be required.

  • Click Win+R to open Run, then type "cmd".

  • Type the following: net user YourUsername "" Make sure to replace YourUsername.

  • Now type: net user Administrator * and set a password for Administrator

  • Now Log out from Administrator and login to your account.

  • Now change your password.

Optional: Assign another administrator. Disable Windows built-in administrator by net user administrator /active:no

2. Using Other OS bootable media

This is helpful if you already have a bootable media.

Windows Bootable

  • Boot your pc from it.
  • When it boots, Press SHIFT+F10 to open Command Prompt
  • Now execute the following:
ren C:\Windows\System32\sethc.exe C:\Windows\System32\sethc.exe.BACKUP
copy C:\Windows\System32\cmd.exe C:\Windows\System32\sethc.exe
ren D:\Windows\System32\sethc.exe D:\Windows\System32\sethc.exe.BACKUP
copy D:\Windows\System32\cmd.exe D:\Windows\System32\sethc.exe

Repeat the same for E: and F: is available

  • Now shutdown your PC.
  • Remove the media and boot again.
  • On login screen, Press SHIFT key 5 times.
  • When Command Prompt opens, type: net user YourUserName *. Make sure to replace YourUserName.

Optional: Assign another administrator. Restore sethc from BACKUP.


** Soucrce from Internet

Thursday, May 27, 2021

How do I disable the Acer Cloud Excel Addin in Microsoft Office Excel/Word/Powerpoint

Open the Microsoft Office Program(Excel/Word/Powerpoint) .. then go to File | Options | Addins | In the 'Manage' dropdown ensure that 'Acer Cloud Excel Addin' Type is 'COM Add-in'.is selected and click GO and un-check the addin you want to disable.

Thursday, December 31, 2020

All about Mi 5C China Rom Phone - How to Flash Rom ? & How to enable 4G LTE on Xiaomi Mi5c? & How to Install Android Apps?


Steps to Install MIUI V8.5.3.0.NCJCNED Global Stable ROM on Mi 5c.


Fastboot Mode

  1. Download MI Flash tool, Unzip and Install it on your PC.
  2. Download MIUI V8.5.3.0.NCJCNED Fastboot file for your device from above link.
  3. Reboot your device into Fastboot mode ( Press “Volume Down + Power” buttons to enter into Fastboot mode)
  4. Connect your device to PC
  5. Extract the downloaded fastboot zip file and copy the folder path.
  6. Open the MI Flash Tool and Paste the copied folder path in the MI Flash Tool.
  7. Click on the refresh button (It will recognise your device) and click on the flash button to start the installation.
  8. Wait until the installation process completes.
  9. Done!!!
Download:


How to enable 4G LTE on Xiaomi Mi5c?


if your mi5c is running china rom and you are getting 2G network only, then you need to do something to enable the 4G and 3G network. Don't worry it's not difficult to enable 4G network on mi5c, just follow my step by step tutorial below.

Step by step how to enable 4G network on xiaomi mi5c
  1. go to phone dialing menu
  2. dial this number
  3. *#*#1#*#*
  4. the 'Song Assistant' menu will appear, select 'TEL_Assistant'
  5. select 'Telephony' and then 'Radio Access Tec'
  6. choose the '5 MODE' and then 'Save'
  7. reboot/restart your device
  8. done! you should now have 4G network

How to install Google Play Store in any China MIUI 

 To install Google Play Store on your MIUI. Follow the steps below to install google play store on your MIUI.

1. Go to the Mi App Store and search for Google on the search bar. Now scroll down to bottom and click on the Baidu icon. You'll see an app about 168 KB size with Google Play Store logo, install it.


2. Open the app and click on the blue round icon below. It will start downloading the Google Service Framework. You'll need to install it manually just by clicking install.
Note: You'll need to enable Unknown sources from Privacy setting. If not enabled, it automatically promotes for enabling.

3. Now it will download Google Account Manager, Google Play Services, Google Calendar Sync, Google Contact Sync one by one and you'll just need to tap on install.

4. Finally, it will download Google Play Store! Just install!

5. After installing Google Play Store, log in to the Play Store using your Google Account and Enjoy Google Play Store.

That was it! Hope this will help you to install Google Play Store easily.

Source from Internet


Thursday, June 11, 2020

Infinitely Looping Startup Repair Loop without Reinstalling Windows 7


If you've ever experienced a Startup Repair that continously loops and fails to fix the problem of not being able to load windows, even in safe mode, then you'll know that usually the only way to recover from this when System Restore does not work is to do a clean install of Windows.

Until now.

This tutorial will show you how to use the System Recovery Options provided by Windows to recover your system to a working state so that you don't have to risk losing data by performing a clean install.

Recovering Your System
  1. Boot to the System Recovery Options screen.
    • If Windows automatically opens Startup Repair, and subsequently fails to fix a problem, you can skip ahead to step 4 below.
  2. In the System Recovery Options screen, click Startup Repair:

  1. Windows will search for an attempt to repair startup problems:

  1. If startup problems could not be repaired, you will receive the message Windows cannot repair this computer automatically. Click View advanced options for system recovery and support:

  1. Click View advanced options for system recovery and support, which which bring you back to the main System Recovery Options screen.
  2. Click Command Prompt:

  1. Command Prompt should open to X:, which is an internal ram disk use by System Repair:

  1. Now you need to find your system drive. Depending on how your system is setup, this could be either C: or D:.
    1. Type C: and press .
    2. Verify that this is your system drive by typing DIR and pressing . If you see the Program FilesUsers and Windows folders, then you have found your system drive, and can continue to step 9 below.
    3. If the drive is not your system drive, repeat steps I and II above, changing the drive letter to D, E or some other letter until the system drive is located.

  1. When you have located your Windows system drive, type CD \windows\system32\config and press :
  2. Type DIR and press , and verify that the following files and folders exist in the config folder:
    • RegBack (which is a folder)
    • DEFAULT
    • SAM
    • SECURITY
    • SOFTWARE
    • SYSTEM

  1. Type MD mybackup and press  to create a backup folder that you can use incase this procedure does not work as expected.
  2. Type copy *.* mybackup and press .
    • If Now you need to check if you can use the automatic Windows backups to restore your registry:
    1. Type CD RegBack and press  to go to the RegBack folder.
    2. Type DIR and press  to view the contents of the folder. All the following files must exist:
      • The DEFAULT, SAM and SECURITY files should each be about 262,000 bytes in size.
      • The SOFTWARE file should be about 26,000,000 bytes.
      • The SYSTEM file should be about 9,900,000 bytes.
      • The file sizes presented here are approximate estimations, and may vary depending on your system. If any one of them are 0 bytes, then you should stop what you're doing now and seek an alternative method of recovering your system, because Windows cannot function with a 0-byte size registry hive.
    3. If the hive files listed in RegBack are ok, then proceed to step 14 of the tutorial.

  1. Type copy *.* .. and press  to copy the backup hive files to \Windows\System32\config.
    • If you are prompted to overwrite existing files, press A to allow all file to be overwritten.

  1. Type exit and press  to close the command prompt.

  1. Click the Restart button to reboot your computer. If all goes well, your system will boot normally.


Use Windows 10 Boot Loop Automatic Repair
Windows 10 boot loop automatic repair can appear after several times boot failure. And from there you can do some rescue for Windows 10 reboot loop. Please try the followings:
Step 1. Power off the PC and then power it on. As soon as you see the rotating loading circle, press and hold the Power button to shut it off.
Step 2. Repeat this process a few times until you see the "Preparing Automatic Repair" screen.
Step 3. After "Diagnosing your PC" interface, you will see the "Automatic Repair" screen. Here you need to select "Advanced options".
Step 4. Select "Troubleshoot" -> "Advanced Options" where you get multiple choices.
Step 5. Select "Command Prompt" and continue running the following command lines:
  • c: (Note that you system drive may be different. You will have to figure it out by yourself by viewing the directory.)
  • dir
  • cd \windows\system32\config
  • MD backup
  • copy *.* backup
  • CD regback
  • dir
  • copy *.* ..
  • A
  • Exit
 When you get back to "Choose an option", click "Continue (exit and continue to Windows 10)" and see if Windows 10 continuous reboot ends.


 Source From Internet


Thursday, October 20, 2016

How to disable the ‘Enter Network Password’ prompt.- Windows 7


SOLUTION:

a) Open Control Panel and ‘System and Security’ then click on ‘Administrative Tools’ and ‘Local Security Policy’.

b) Expand ‘Local Policies’ and select ‘Security Options’.

c) Double-click on ‘Network access: Sharing and security model for local accounts’, choose Guest only option from drop down menu and click OK.

d) Double-click on ‘Accounts: Limit local account use of blank passwords to console login only’, which is enabled by default. Disable this option and click OK.


At the same time you may want to disable password protected sharing as well
thats Control Panel - Network and Internet - Homegroup - Change advenced sharing settings -
Password protected sharing choose to turn off save changes

Share a Printer from XP to Windows 7/8/10

  Setup Printer Sharing Step 1 : First make sure that the printer on the XP machine is shared. You can do this by right-clicking on the prin...